Bringing the 3D Cartoon Moon and Star to Life: A Guide to Quality Printing and Design
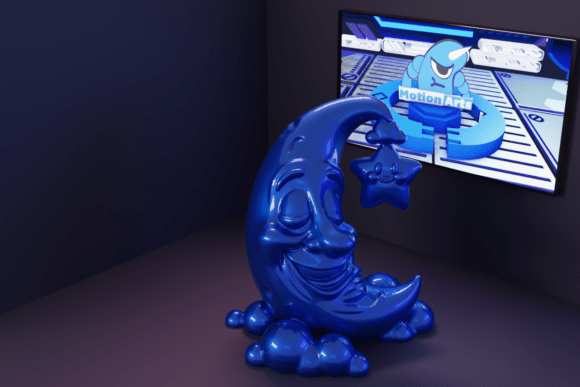
The allure of celestial decor is timeless, but the 3D Cartoon Moon and Star model brings a modern, whimsical twist to this classic theme. Whether you are a parent looking to soften a nursery, a hobbyist seeking a satisfying print, or a small business owner aiming to sell charming home accessories, this STL file offers a unique blend of sweetness and magic. However, downloading the file is only the first step. Many enthusiasts rush into printing without considering the nuances of scale, material choice, and post-processing, leading to results that lack the intended charm.
To truly capture the calm, tenderness, and imagination this piece symbolizes, you must approach the project with a clear strategy. Below, we explore common pitfalls in bringing this specific design to reality and provide practical advice to ensure your final product is as enchanting as the digital model promises.
Understanding the Design Intent
Before slicing your file, it is crucial to understand what makes the 3D Cartoon Moon and Star distinct from generic celestial models. This design is characterized by soft, harmonious curves and a stylized aesthetic that conveys peace and positive energy. Unlike realistic astronomical models, which prioritize scientific accuracy, this cartoon-style piece prioritizes emotional resonance. It is designed to be delicate, fun, and inviting.
Many users mistakenly treat this model like a standard functional part, focusing solely on structural integrity while ignoring the artistic finish. This approach often results in a rigid, industrial-looking object that fails to evoke the desired sense of wonder. Recognizing that this is a decorative art piece should influence every decision you make, from printer settings to paint selection.
Common Mistakes in Scaling and Orientation
One of the most frequent errors beginners make is ignoring the recommended scale. The 3D Cartoon Moon and Star is optimized for specific dimensions that balance detail visibility with print stability. Printing it too small can cause fine features, such as the star’s points or the moon’s facial expressions, to merge or disappear entirely. Conversely, printing it excessively large without adjusting layer height can result in visible stepping artifacts that disrupt the smooth, soft aesthetic.
Another critical oversight is poor orientation on the print bed. To achieve the best surface quality on the visible faces, you must orient the model to minimize support structures on prominent areas. Supports left on the curved surfaces of the moon can leave scars that are difficult to sand away, compromising the "sweetness" of the design. Always preview your slice carefully and rotate the model so that flat or less visible areas bear the brunt of the support interfaces.
Material Selection and Print Settings
Choosing the right filament is essential for capturing the delicate nature of this STL model. While PLA is the go-to for ease of use, not all PLA behaves the same. Standard PLA can be brittle, which is risky if the piece is intended for a child’s room or a high-traffic area. Consider using PLA+ or PETG for added durability without sacrificing the ease of printing.
Furthermore, many users overlook the importance of layer height. For a model that relies on smooth curves to convey calmness, a standard 0.2mm layer height might be too coarse. Dropping down to 0.12mm or 0.16mm can significantly enhance the visual appeal, making the transitions between the moon and star seamless. This small adjustment takes more time but yields a professional-grade finish that justifies the effort.
- Layer Height: Aim for 0.12–0.16mm for smoother curves.
- Infill: Use 15–20% gyroid infill for a balance of strength and material efficiency.
- Supports: Use tree supports if available, as they are easier to remove and leave fewer marks on organic shapes.
The Art of Post-Processing and Painting
The 3D Cartoon Moon and Star is ideal for painting and customizing, yet this is where many projects fall short. A common mistake is applying paint directly onto the printed surface without proper preparation. 3D prints often have minor layer lines and imperfections that become glaringly obvious under a coat of solid color.
To avoid this, start with a thorough sanding process using fine-grit sandpaper. Follow this with a primer specifically designed for plastics. Primer not only helps the paint adhere but also fills in microscopic gaps, creating a uniform canvas. When choosing colors, remember that this piece symbolizes dreams and peace. Soft pastels, warm yellows, and gentle blues work better than harsh, neon tones. Consider dry-brushing techniques to highlight the raised details of the cartoon face, adding depth and character to the model.
Integrating Lighting for Maximum Impact
This model is perfect for themed lamps, but integrating lighting requires careful planning. A frequent error is attempting to force an LED module into a cavity that wasn’t designed for it, which can crack the thin walls of the cartoon star. Instead, measure your light source before printing. If you plan to illuminate the piece, consider designing or downloading a modified base that accommodates wiring, or use battery-operated puck lights that sit beneath a translucent print.
Using translucent filaments can create a magical glow effect, but be aware that layer lines become more visible when lit from within. To mitigate this, you can acetone smooth ABS prints (if using ABS) or apply a thin coat of epoxy resin to PLA prints to diffuse the light evenly. This transforms the 3D Cartoon Moon and Star from a static object into a dynamic source of ambient warmth.
Final Checks Before You Print
Before hitting the print button, take a moment to review your setup. Ensure your bed is leveled, your nozzle is clean, and your filament is dry. Moisture in filament can cause bubbling and weak layers, which is disastrous for a detailed decorative piece. Additionally, check the model for manifold errors using repair tools in your slicer software. Even exclusive STL files can occasionally have minor mesh issues that need correction.
By avoiding these common pitfalls and focusing on the artistic intent of the design, you can create a piece that truly embodies the magic and charm promised by the 3D Cartoon Moon and Star. Whether for personal enjoyment or commercial sale, attention to detail in scaling, printing, and finishing will ensure your creation stands out as a symbol of dreams and positive energy.
Take your time, experiment with colors, and enjoy the process. The satisfaction of holding a beautifully finished, custom-painted celestial figure is well worth the effort. Download now and bring the magic of the 3D Cartoon Moon and Star to your world, ensuring every detail reflects the care and creativity you invested.