Mastering the Peony Texture Roller STL for Flawless Floral Impressions
Creating intricate, professional-grade textures on polymer clay, fondant, or ceramic surfaces often feels like a battle against time and tool limitations. Many crafters spend hours hand-carving details that still lack uniformity, only to find their final product looks amateurish despite their best efforts. This is where digital fabrication meets traditional artistry. The Peony Texture Roller STL offers a sophisticated solution, allowing you to imprint lush, layered peony blossoms with consistent precision. However, simply downloading a file and hitting print does not guarantee success. Understanding the nuances of 3D printing parameters, material compatibility, and design scaling is essential to avoiding wasted filament, ruined molds, and disappointing results.
Understanding the Digital Tool Before You Print
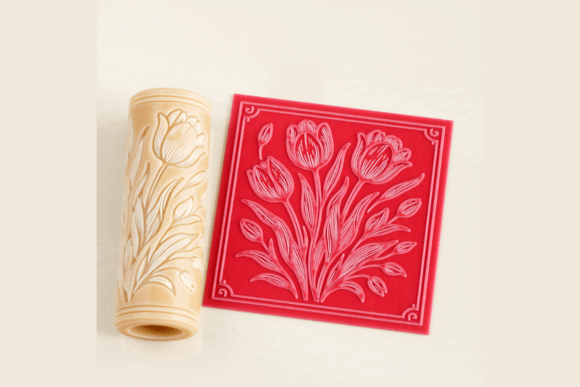
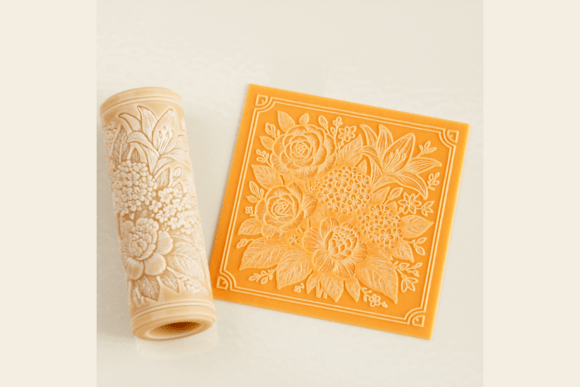
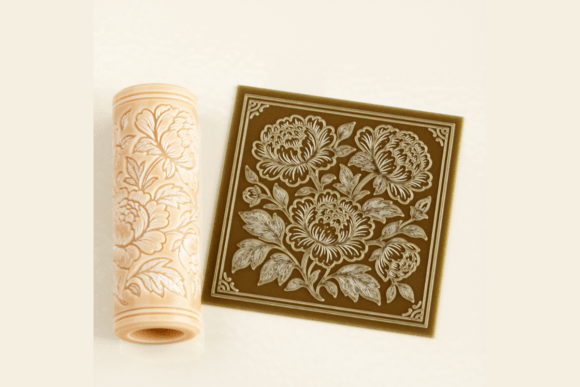
The Peony Texture Roller STL is not merely a decorative item; it is a functional engineering model designed for specific mechanical interactions. It features highly detailed floral patterns optimized for smooth rolling action. When you acquire this digital download, you are receiving a ready-to-print file compatible with most slicers. Yet, a common misunderstanding among beginners is treating all STL files as identical. This specific model is high-resolution, meaning it captures the delicate veins of leaves and the soft curves of petals. If you approach it with low-quality print settings, you lose the very detail that makes it valuable.
Why do creators gravitate toward this specific design? The peony motif is timeless, offering an elegant aesthetic suitable for jewelry, baking decor, and home accents. Unlike generic geometric rollers, this tool adds organic charm that appeals to customers seeking handmade authenticity. Whether you are crafting ring trays, artisan soaps, or ceramic tiles, the depth and clarity of the impression can elevate a simple slab of clay into a premium product. But this potential is only realized if the physical roller matches the digital promise.
Common Pitfalls in Printing and Preparation
One of the most frequent mistakes users make involves ignoring recommended print settings. The model is optimized for layer heights between 0.1 and 0.15 mm. Attempting to speed up the process by using thicker layers, such as 0.2 mm or higher, results in visible stair-stepping on the curved surfaces of the flowers. These ridges transfer directly onto your clay or fondant, creating a rough, unpolished look that requires excessive sanding or reworking. For FDM printers, this means slower print times but significantly sharper details. For SLA, DLP, or resin printers, the high resolution ensures crisp edges without the need for extensive post-processing.
Another overlooked detail is the necessity of supports. While many complex models require extensive support structures, this roller is designed to be printed without supports when oriented correctly. Adding unnecessary supports can leave scars on the rolling surface, which then mar your creations. Users who ignore the "no supports required" guideline often spend more time cleaning the roller than using it, and they risk damaging the delicate petal tips during removal. Trust the design optimization; slice it as intended to preserve the integrity of the texture.
Material Compatibility and Usage Errors
Once printed, the next phase where errors occur is in application. A significant misconception is that one texture tool fits all materials equally. The Peony Texture Roller STL works exceptionally well with polymer clay, fondant, soap, and ceramic paste, but each medium reacts differently to pressure and release. For instance, when working with sticky fondant or soft polymer clay, failing to dust the roller with cornstarch or use a light coating of oil can cause the material to adhere to the deep crevices of the peony design. This leads to tearing and distorted impressions, ruining both the project and potentially clogging the roller.
Furthermore, users often apply uneven pressure. Because the roller is 3 inches (7.5 cm) in standard format, it covers a decent surface area. Pressing too hard on one end while neglecting the other creates inconsistent depth in the floral pattern. The result is a patchy design where some peonies are deeply embossed while others are faint. The correct approach is to roll slowly and evenly, allowing the weight of the tool and gentle, consistent force to do the work. This ensures every leaf and blossom is captured with uniform clarity.
Scaling and Customization Missteps
The flexibility of digital files allows for resizing, but this feature is often misused. The model is high resolution, meaning you can scale it to fit larger projects like mugs or smaller items like jewelry components. However, scaling down too much can cause the finer details to merge, turning distinct petals into a blurry mass. Conversely, scaling up excessively without adjusting print resolution can make individual layers visible and coarse. Before committing to a large batch of products, always print a test piece at your desired size. Check the clarity of the smallest leaf veins. If they appear blocky, reduce your layer height or adjust the scale slightly until the balance between size and detail is optimal.
Additionally, remember that this is a digital download. No physical item will be shipped. Some buyers mistakenly expect a tangible tool and are confused upon receiving only a file. Ensure you have access to a 3D printer or a local printing service before purchasing. Verify that your slicer software can handle STL formats and that your printer bed is large enough to accommodate the 3-inch length, although most standard printers handle this easily.
Maximizing Value for Small Businesses and Hobbyists
For entrepreneurs and small business owners, consistency is key to brand reputation. Using a hand-carved stamp might yield unique results, but it lacks the repeatability needed for product lines. The Peony Texture Roller provides that consistency. Imagine producing a set of ceramic coasters or a collection of polymer clay earrings. With this roller, each piece shares the same elegant floral signature, reinforcing your brand identity. To maximize this benefit, maintain your printed roller carefully. Clean it gently after each use to prevent residue buildup, which can degrade the sharpness of the impressions over time.
Educators and workshop leaders can also leverage this tool to teach students about pattern repetition and surface design. It simplifies the learning curve, allowing beginners to achieve professional-looking results quickly, which boosts confidence and engagement. Instead of struggling with basic carving techniques, students can focus on composition and color, using the roller as a reliable foundation for their artistic expression.
Final Checks Before You Begin
Before you start your next project, take a moment to evaluate your setup. Ensure your printer is calibrated for fine details. Choose the right material for your medium—whether it’s food-safe considerations for fondant or durability for polymer clay. Test the roller on a scrap piece first to gauge pressure and release agents. By avoiding these common pitfalls and respecting the design’s optimizations, you transform a simple digital file into a powerful asset for your creative toolkit. The Peony Texture Roller STL is more than just a pattern; it is a bridge between digital precision and tactile beauty, offering endless possibilities for those who use it wisely.